
Photos 1 & 2 above and below are the completed flat car.
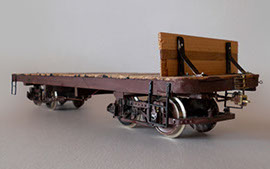
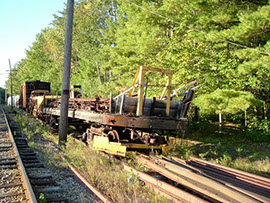
Photo 3

Photo 4
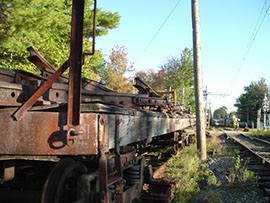
Photo 5
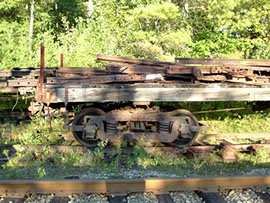
Photo 6
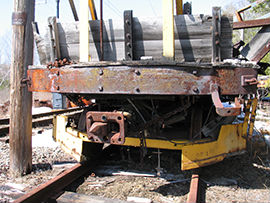
Photo 7
Streetcar or Interurban flat car
Most streetcar railway or interurban systems had other rail cars that were devoted to either revenue freight or non-revenue/maintenance of way duties. Some were powered (motor, controllers and trolley poles) and others were towed along. Light Rail Products (LRP) decided to build one utilitarian flat car, using a North East Narrow Gauge (NENG) flat as a starter. You don't need to use this as a starter platform, you could produce your own frame and deck out of strip wood, or use LRP frame and deck which will be available in the near future.
LRP hopes to inspire you to produce your own creation using this as a basis for your own fleet of cars.
Common modeling tools and glues are needed, as is safety equipment that will make your time building this (and other cars) more enjoyable. Razor saws, paints, wood glues, pliers, modeling knifes, safety glasses, respirator (if you are using spray paints) etc… all make the tasks ahead easier, and some thoughts on safety while modeling will keep you healthy. This wood car was assembled using waterproof wood glue.
You will see as the model progresses, some slight modifications are used to make this into a proper piece of work equipment.
Photos 1 & 2 show a completed streetcar or interurban flat car project. Many LRP products were used to complete this car. LRP 001, the Hedley Anticimber, LRP 002 St. Louis Couplers, LRP 009 Brill Ttrucks, LRP 032 Stirrup Steps.
Photos 3, 4 & 5 This shows a flat car # 0554 that was built by the Russell Car
and Sweeper Co. in 1911. The car was built for the Cambridge Tunnel Rapid Transit (now the Red Line on the MBTA), manufactured by Russell Car and Sweeper Co. in 1911. In later years, it became the property of the Boston Elevated Street Railway of Boston, MA.
Photo 5 & 6. Note some modern welding used to hold some brackets, and the stirrup steps are bolted onto the wood side sill. Since these photos were taken (at the Seashore Trolley Museum, Kennebunkport, ME) the car has been scrapped due to it's overall poor condition.
Photo 7. Later in it's career in Boston, it became a snow plow, as you can see the plow wings ahead of the wheels sets.
For our modeling purposes, this Russell built flatcar was chosen as a basis for the streetcar flat car project. Several reasons are; it is wood, and some metal materials, the car has radius ends or (end sills) had to handle tight corners while being coupled to other cars. The car shows where other parts have been welded on, so it could be modeled in recent times as well. It does not appear to have any sort of brakes, although it would seem like it may have had air brakes or at least a hand brake at one time in it's life. While our car is not an exact model of # 0554, it is a generic flat car that could be used on any streetcar system or small interurban line.
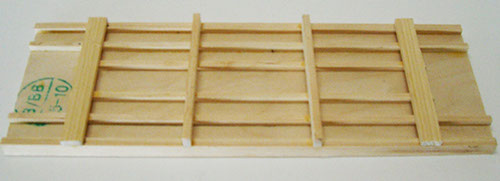
Photo 8 (above) This shows the the basic NENG frame looks when assembled. The original intent of this car was just to build it as a narrow gauge flat car, similar to the one in Photos # 15 & 16. When LRP decided to make this into a street railway flat car, some alterations needed to be done. In Photo 8, the car bolsters had been set in place. For the street railway flat car model, they were removed, set closer towards the car ends and re-glued in place.
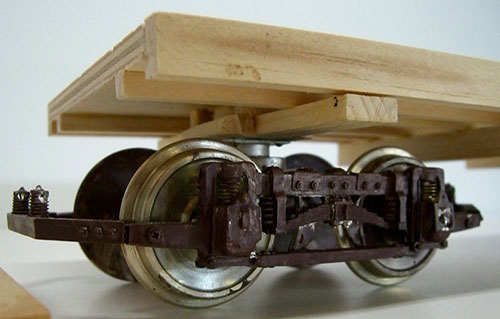
Photo 9 (above) This photo shows the new location of the wooden bolsters after being glued onto the car ends and that the Brill 27 trucks, LRP 009, hang out beyond what is now the end of the car.
At this point, you might start looking to see how the overall car height appears. In this project, it seemed proportionally to high, and so the truck bolsters were cut down (filed down) to lower the overall height of the street railway flat car.
To produce the radiused end sills; a large can with a wide radius was used to first draw the arch on the sill (or you could use paper). Alternatively, one could use a compass or other instrument. Where the end sill meets the side sill, the radius is much tighter. This was done by centering the end sill on the end of the car and drawing a line outward to the end of the end sill and making a radius that looked OK to the eye or reasonable. Different car builders designed the end sills for different reasons. Some end sills were designed so the radius across them was constant and just stopped when it joined the side sill. The Russel built flat car appears to be one of a consistent radius. Ours tapers in tight to meet the side sills.
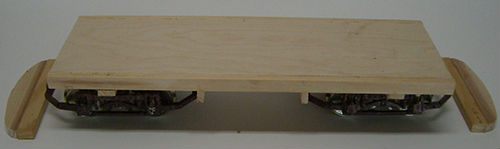
Photo 10 A small 3/8” wide spacer block (wood) was also sandwiched between the end sill and the car body to allow the end sill to hang over the end of the Brill truck.
After sanding the ends smooth (the end sill where it meets the 3/8” block and then the car body). You could add some small pins to help keep the end sills on the car. Do this by drilling small holes into the end sills and into the main body. This will help keep the sills attached should you bump the model. Glue the sills onto the main part of the body.
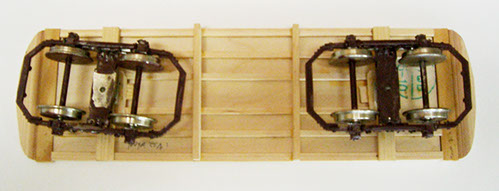
Photo 11 (above) This shows the underfloor of the car and how the radius ends now overhang the trucks.
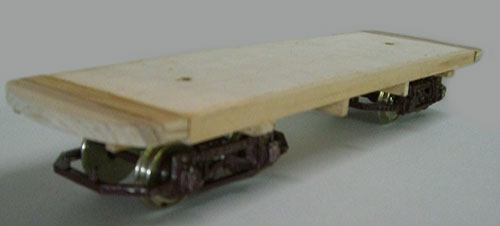
Photo 12 You can see the holes have been drilled through the deck for the flat head screws to hold the trucks to the car body. The trucks are heavy, and therefore using a machined flat head screw, washer and nut would be appropriate. Be sure the holes for the screws are centered across the width of the car body. You should temporarily install the trucks to see how they look. Do they swivel OK? How do they look overall on the car? You can remove them and permanently install them later when the body is complete.
A metal end plate or cap over face of the end sill could be added at this time. Some nut bolt washers (n/b/w) detail could be added as well.
The car deck is made by adding thin (1/2” X 1/16”) planks across the deck. Once you have loosely made all the planks and set them onto the deck to be sure they will all fit correctly (maybe a few need to be sanded a little to make them all fit on the deck). Glue these on, some weight may need to be added to keep he planks from warping. Then once dried, some color could be added to the deck and car body. Color for the trucks as you go along will help bring the model to life, and begin to look more like a finished product. A certain amount of weathering of the car body and deck could begin at these stages.
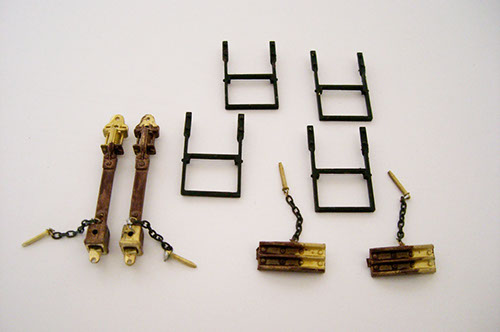
Photo 13 LRP details to be added to car. (Left to Right)
Note: Chains and paint added by LRP modeling staff.
Painting is not 100% completed. Chains have been soldered
onto the pin and the Coupler body as well as the Anticlimber.

Photo 14 Couplers are to be added. LRP 002 has an anchor that will be attached up under the car body (above). A block needs to be installed ahead (towards the car ends) for the coupler anchor. The anchor should be pre-drilled for the coupler, and test fit for smooth operation and to be sure there is no binding.
Other details: In photos 1 & 2, there is short end bulkhead added to the car deck and some end bracing and framing.
Additional details you could add are; hinges for sideboards, end boards, brake wheel, air brake cylinder (under the floor), stake pockets, ring hooks. For the deck, you could add a load of junk (see pictures 3, 4, 5 for examples), or could be ballast, or dirt from work projects, lumber, railroad ties for other construction projects, or perhaps a bunch of worn out streetcar parts from the shop, such as old wheel sets, trolley poles and bases, compressors, couplers. It could be an impressive part of your railway equipment.
© Light Rail Products