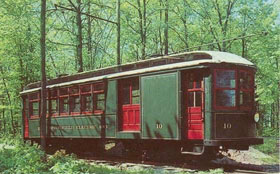
photo by Ralph N. Bacon
This car is currently owned by and stored at the Warehouse Point Trolley Museum in East Windsor, Connecticut.
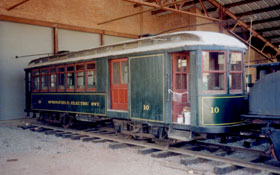
photo by Aaron Isaacs
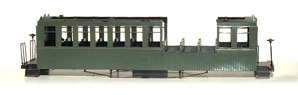
This is the Bachmann Combine with roof and trucks removed. This is the starting point of kit-bashing the car.
Photo above starting from left shows the original portion of the roof (black part) followed by LRP #010 Roof Modification. On right, is the new roof section glued onto the original Bachmann roof.
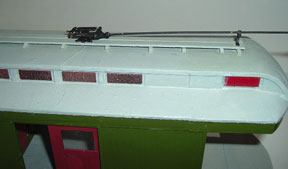
Photos above and below, show completed roof with trolley cleats, boards and trolley base + pole installed.
Spare coach from which windows were removed. Photo below shows one window spliced into the final model.

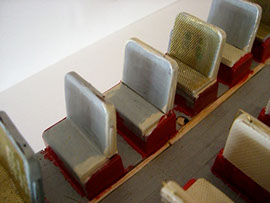
Brass screen glued onto the surface of the seats.
Painted seats.
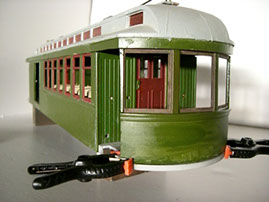
The front dash being glued onto the main body of the car. Note the two clamps to hold this in place.
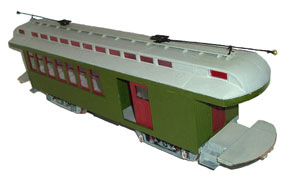
Springfield Terminal Car #10
Concept
Conversion of a Bachmann Combine Passenger Car into a Wooden Interurban Car. This project uses a Bachmann combination car, plus some parts from another. (You can use a coach, or baggage car as well). The end result we are trying to make is a small New England or any other small short line wooden Interurban car.
Background
This particular car we are modeling is a 1901 Wason Car Company product that was built for the Springfield Terminal Railroad in Vermont. As a side note, the Springfield Terminal Railroad was later used to “swallow up” the Boston + Maine and the Maine Central Railroads as parts of Guilford Railroads, Springfield Terminal Railroad Company.
Below are many of the parts used in kit-bashing this particular car.
LRP products:
LRP #004 Trolley Bases + Poles
LRP #006 Ohio Brass Trolley Catchers
LRP #010 Roof End Modifications
LRP #012 ALCO Interurban Trucks
Other products used:
Bachmann Combine + Passenger car
Wood (assortment of bass wood)
Glue
paint
In making the “Springfield Terminal” Car, the original car has one more window set on each side than the “out of the box” Bachmann combine has in it. In order to add a window on each side, a second Bachmann coach was stripped and two windows cut out to splice into this car. Later, the overall length of this Bachmann coach will be reduced and be fashioned into a small Interurban Coach. Or, you could choose to skip this step all together.
Disassembly: Begin with disassembly of both of the Bachmann cars by first removing the trucks. These will not be needed again, but store for future use. Remove the screws that hold the body to the floor/frame. Following this, at each end of the car, near the end doors, are two tabs that must be pushed to clear the car shell from the floor section. Then, remove the screws that hold the roof in place. Remove the wiring for the lighting, and the various plastic parts, but keep the clearastory windows as you’ll need these later on. Hold onto all parts, you may want or need later.
Roof Modification: Beginning with the roof. Turn the Bachmann roof upside down, take LRP #010, the Roof Modification and carefully line it up with the Bachmann roof. You’ll see a piece running across the underside of the roof about 1 inch from the roof’s end.
Line the LRP part up with this, and draw a line where you will cut the Bachmann roof in order to splice and join the LRP roof section. Make the cut as square to the car roof as possible, then do the same at the other end. You may need to clean the ends of plastic flashing in order to make these smooth. Glue one of the ends on. Test fit the roof and the second roof mod (LRP #010) to be sure the roof still fits onto the car shell.
If this is OK, glue the second roof mod onto the main roof shell. You should have a flat surface handy to be sure the roof sections are flat and lined up as best possible. Use a metal ruler (24'') to line the new roof sections up with the original roof section.
Once you have glued these parts together and the glue has set, fill in the voids with glue and modeling putty. Sand smooth. Use tissue to simulate roof canvas on this model’s roof. Paint on some color and carefully lay over the tissue, painting over the tissue slowly. This is very time consuming, being very careful not to wrinkle the tissue. This will also help to hide the voids in the joint you have made. Once all the tissue has been painted and has set up, paint the underside of the roof sections. The tissue and paint will help make a stronger joint or connection in the roof sections. For paint on the interior, a light yellow was used which will help reflect the lights later on.
Trolley Boards: The next item is to add the trolley boards, trolley bases and hooks. Typical trolley boards are approx 1 foot wide, and the cleats that hold them to the roof are 2'' x 3'' x 29'' long. These have a small radius to contour them to the roof. These are usually placed onto the car roof ribs, which generally line up between the clearastory windows. Paint the cleats and trolley boards prior to assembly.
Lay out the trolley poles to help decide where the bases should be located. On this model, the pole wheel assembly is placed over the car end, so the wheel assembly of the pole is about even (vertically) with the end of the car bumper. After drilling the holes for the bases at each end, then make the boards and make some relief in them for the base post, and then glue these down to the roof onto the cleats.
Add the trolley hooks and insert the pole + bases, and set this aside. The trolley hooks should be slightly offset, so if you have two cars close together in your yard or car shop / car house, the poles do not hit each other. The offset should be the same direction for all your rolling stock.
Extra Window: Splicing the extra windows in. After removing the Bachmann combine car body from the basic frame, and doing the same to the Bachmann coach, carefully measure the window openings, and very carefully cut into the coach so that the wooden car side would meet up between the windows. Finish the cut just below the window ledge and then use an exacto knife to cut under the ledge. You want to keep the ledge under the window to use as a guide in lining up the window on the combine.
Carefully measure out and make and mark lines to follow on the combine. You might cut things a little short and gently cut and file to make the new window fit. Too big of an opening, and you’ll have some patch work to do. Once this is cut and the window fit, glue the windows in. You may have a little sanding and filing to do to make these look correct once installed. This is a good time to add some paint to the car shell, both inside and out.
CAR FRAME AND PLATFORMS
Option 1
Remove the screws that secure the car seats and floor. Set these aside.
In making the new car end platforms, the end bumper should be longer in distance than the car roof. In other words, if you measure the entire roof and the entire frame separately, the car frame should be longer then the roof section by approximately 1 scale foot or 6 scale inches at either end.
The floor of the new ends should be made of 1/16'' plywood. Use the car roof to draw an outline onto the plywood. (see photo). Once this section is cut out, carefully reduce the thickness of the plywood only where the original car platform remains. The car end platform should also be cut down and made square to the frame. The overall length of the original platform will be reduced. Cut the end (or forward) edge of the steps off. The steps remaining on the frame will hold the new steps in place.
Two notches were also cut into the underside of the original end beams so that two new framing knees could be added for overall strengthening of the platform area. Two small wooden stringers were added, approx 1/4'' x 1/4'' x 3.5'' for platform strength.
Option 2
LRP is currently working on producing resin car ends, plus a new floor section to add onto your Interurban Car. See details LRP #011
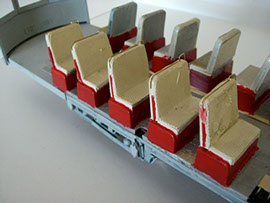
Seating: The seats. Remove the seat and floor section from the car. You will need to add two seats from the other car from which you removed the window. In this model, the seats should have a slight rake to them. The ones that come with the combine and coach are straight. Looking at the back side of the seats, estimate where the back and the seat cushion would meet, and cut a slot or actually a small wedge shape out. Press the seat back, backwards towards the cushion, add some glue once you have the seat back at an angle. You need to clamp these down while the glue sets up (or a heavy weight). Modifying the seats in this manner takes a while.
A way I found to make the seats look a little better is to purchase brass "screen" from a hobby shop, Cut it to the shape of the seat cushion and back, and glue it on to the surface. The take paint (color; cream) and place it onto the surface rather thick. This will fill in the gaps in the screen mesh and leave a pattern that will look some what like rattan webbing.
If your car is going to be running or operating in two directions, you may want to make one set of seats face the opposite direction. On this model, one set faces one way, the other side of the aisle, the other way. LRP will also be offering rattan LRP #022 type seats soon, so you can replace all these molded seats with something nicer.
Later I glued a small thin brass wire to the top ridge of the seat and fashioned a handle separately. These were also glued to the surface to make the seat appear a bit more realistic.
Trucks: This car originally had a Taylor truck under it. Presently, these are not available, so the option is to use LRP #012, the ALCO trucks. The original bolsters have been cut away, as the ALCO truck takes more room under the car. Building new car body bolsters from wooden strips that run across the body were made ( 3/4'' wide by 3/16''). Once the locations for the trucks are identified by being sure the trucks will have plenty of room to swing to clear the now present steps, these can be glued into place. Later the bolster plate can be centered and glued into place as well. The trucks can be secured to the car. Be sure they are secure, and that they cannot fall away while the car is being handled.
Next installment: couplers, steps and interior details.
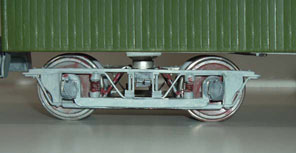
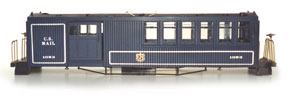
LRP #012 ALCO Truck assembly with some weathering paint applied.
© Light Rail Products