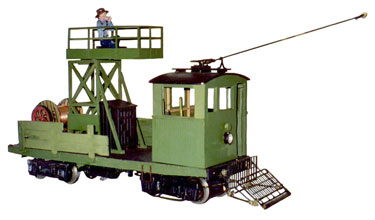
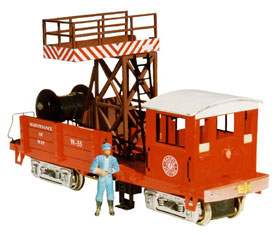
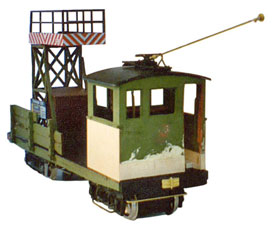
This shows the cab as raised and painted. The tower is in a new location from previous views. The trolley wire reel has been mounted in rear. LRP Details added: Eclipse Fender, Crouse Hinds Headlight, Ohio Brass Trolley Catcher, Trolley Base, Pole and Hook.
Overhead Line Repair Car
Beginning with a Hartland Overhead Line Car or Work Car.
Concept
The project involves converting this into a more appropriate type or style of over headline repair car. One thing you’ll want to do is consult your files for line cars and work cars, and see what it is you will enjoy seeing operating on your layout.
This car will be a combination of cars: A work car from the Boston + Worcester St. Railway (#4, Motor flat) formerly of Massachusetts, and adding to it, the overhead line repair equipment. An LGB repair tower car was purchased and will be used for the tower. You can fabricate your own tower, but this
is simpler and quicker.
Products used:
LRP #001 Hedley Anticlimber (1 each)
LRP #002 St. Louis Coupler (1 each)
LRP #003 Eclipse Fender (1 each)
LRP #004 US 13 Trolley Base + Pole (1 each)
Hartland Line car
LGB # 45300 Catenary Repair Tower Car
Various bits and pieces of wood + styrene
Disassembly
First, remove the front steps, trolley pole & tool box. Loosen cab from frame (securing screws are underneath), two other screw secure weights, remove these also. Take roof off of the car body (this is held in place by the headlight lenses that protrude into the car shell.) Remove the window materials.
Next, carefully cut the front headlight ring from the upper part of the shell + save it. Sand the headlight ring flat on the backside, and glue it, centered (side to side) over the car numbers. Some thin pieces of wood were added along the lower portion of the doors and left side front window to raise these edges of sash so they will now line up. Also added, was a short piece of thin styrene to the cab, covering over the hole where the headlight fixture was originally mounted.
Using the rear of the present line car as a template, outline the curve portion of this, and draw this onto a small piece of wood (1/2" X 1/2" X 4"). Shape this wood and attach it to the front of the model. Once it’s fitted properly, it is then glued onto the front of the car and the Hedley Anticlimber LRP #001 was installed. (Be sure to drill out the holes in the anticlimber first, for the tow pin), prior to attaching to the car frame.
The tower from the LGB model was removed and set onto the rear deck of the model for viewing. This is just temporary. The tower appears tall and may get cut down a little.
This was accomplished in a relatively short amount of time.
The next process involved the roof, truck modification and further cab modifications.
Roof: The roof’s center hole was first filled in and made smooth, by gluing a small piece of plastic styrene to the cab ceiling, and then using modeling putty to fill in the roof surface. The hole for the trolley pole was first drilled, then trolley boards and cleats were fabricated. The hook was then glued onto the cleats.
Truck: The truck modification is an effort to make a very low cost, streetcar or interurban Brill style truck. First the lower heavy plastic bar that connected the two pedestals was removed. Also removed from each side, was the outer spring equalizer bar. The corners were rounded by filing. New brass strap hangers (2 each side)were fabricated from brass strips. In reality, these go over the top as shown and hang equally down on the back side to hold the lower parts into place. In the model, only what would show was added. A bar was also added around each end of the truck, and this would support the braking equipment to be added later. A piece of round bar stock was used to replace the heavy plastic
square bar.
Cab: For the cab, some “V” grooved wood siding was added onto the lower parts of the cab to make this look like tongue and groove boards. This was done on only three sides (two facing outside and the rear surface only). The front will retain the “new” steel sheeting (original finish). Pieces of wood were added to make the lower window sash line up across the front and rear of the cab. They were smoothed over to look like the windows were always the same size.
The rear side boards have been marked up to look weathered, (cut and marked up with saw teeth, xacto knife marks and cuts etc...) Be careful you do not cut your self in this process !
The model is in the process of being painted a medium shade of green.
Next Stages
Complete the truck modifications, painting of the deck, arrange the back deck, removal of the wire reel, gather appropriate overhead line repair materials (Block + tackle, tool boxes, span wires, etc... Add the Eclipse Fender LRP #003 on the front and St. Louis Coupler LRP #002 on the rear.
Products used in this section:
LRP #004 Trolley Base + Harp assembly
LRP #006 Ohio Brass Trolley Catcher
LRP #007 Crouse Hinds Headlight
Evergreen “V-Grooved Siding”
Ozark Miniatures - “Flywheel w/Brake Assembly” #OL-805-4
Trackside Details – Brake Valve
Trackside Details - Brake Cylinder (TD-156)
Trackside Details - Air Tanks + Valve (TD-149)
Trackside Details - Air Tank Ends (TD-59)
Trackside Details - Small Pipe Fittings (TD-53)
“AAA” battery + “AAA” battery holder + on/off toggle switch, (available at most hardware stores)
When we last left, the cab area, was being painted… After checking the ceiling height many times, it was decided that it was too low. The ceiling height was about 6 scale feet.
Some drastic measures were taken. All the V grooved styrene was first removed. In it’s place, new material (same V grooved styrene) was placed onto the cab. Only this time, when the materials were cut, a 1/2 "(1 scale foot) was added. This not only pushed the ceiling height up, but also increases the window heights as well.
On any railway car, an open doorway adds to the realism. The doorway to be “opened” was carefully cut out and the door set aside. Some wooden filler pieces were glued to the bottom of the door to stabilize it.
On the cab interior, Trackside Details offers a brake stand, which in order to be about the correct height, some brass rod was added and glued in place. Other interior details will be added as time allows (controller, glazing, hand brake, motorman’s stool, etc…).
More exterior paint was applied to the entire car. A new Crouse Hinds Streetcar Headlight LRP #007 was added to the front, along with the Ohio Brass Trolley Catcher LRP #006. Recall we are using the original headlight on the backside, although a new LED LRP #202 was installed. These are operated off a battery, which is contained in the tower’s closet or tool locker. A small switch was installed under the car. The original headlight lens from the car was re-used on the rear headlight. The contrast from the front to rear headlights is an interesting touch.
In the meantime, a new reel for the trolley wire was made by using a small plastic reel from a roll of wire that was on hand. This was cut in two places, removing a 1/2" from the width. It was then re-glued together, some wood pieces added to the outside and the inner faces of the reels as well. These were then lightly painted. Instead of scribe marks (and these would be deep on a wooden reel), they were marked out with a heavy pen. Some hand graphics were added to the side to make it appear it came from brand XX Wire Co. For the “copper” trolley wire, the local hardware store stocks 22-gauge wire. This was rolled onto the reel evenly, and many rows were built up to resemble a 1/2 full reel of wire.
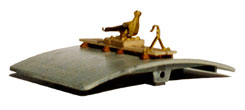
The reel assembly also was in need of some sort of brake, and Ozark Miniatures sells a Flywheel w/Brake Assembly (OL-805-4). The brake pedal itself needed a small platform built so the pedal would be positioned in a manner that would look authentic.
The under floor details: The following Trackside Details products were used: Brake Cylinder (TD-156), Air tanks + Valve (TD-149), Air Tank Ends (TD-59) and Small Pipe Fittings (TD-53). The air tank ends require a small piece of pipe or other round materials to make this look like an air tank. Again, off to the hardware store, where they have small copper connector fittings (1/2" X 1") and they fit nicely. Some piping was added and the Trackside Detail pipefitting came in handy. Wooden brackets were made for the air tanks and metal straps to hold up the larger one. The brake cylinder was mounted off to one side, and if one has the levers to add to this, the levers will be in the center of the car.
The tower: After receiving paint, the “AAA” battery would need to be hidden, (for LED in the headlights). In the tower structure, there is a small closet; this will be used to hide the battery. The Hartland guy was added... playing his harmonica as he inspects the overhead wire for any needed repairs.
The side boards on the car, were weather beaten, one board cut a little shorter than the others, and repainted.
A small piece of the rear end hand railings were kept. A hand brake may be applied to this later.
The rear Coupler LRP #002 was drilled and the small pin attached using a small left over piece of chain. A small carrier bar was produced. This was made from a small square tubing, and has a small radius (hand) bent into it. Two legs were attached to the carbody (one at each end). A wooden piece was made as an anchor for the pivot on the coupler.
The front Eclipse Fender lifeguard LRP #003, assembled previously) was mounted. “Gorilla Glue”, was used, due to the fact it hangs on longer brass wire from the bumper which is higher than a normal streetcar bumper is. At a later date, some straps may be added from under the cab forward to steady this. It should be noted that the car ran in a display for two days, almost continuously, and it never fell off. The chain posts were not used, as one of them would have stuck into the doorway and step area, two small wire hooks were installed into the front wooden bumper.
The Trolley Pole + Base LRP #004, (assembled previously) was added to the roof. The two LEDs were wired (note the Longer leg of the LED is the positive) and the on/off switch was located under the car body. This will allow the headlights to be “ON” even when the power to the car is shut off. If you decide to go with a DCC system, or other control, this may not be a problem.
Items to complete are: the trucks, the interior, graphics, and some general working items on the deck, old and new span wires, trolley wire splices, tools. etc…..
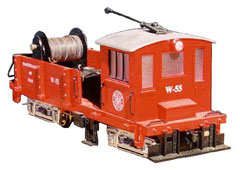
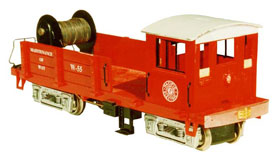
This is a Hartland Overhead Line Car out of the box.
This is a model with the new wooden bumper and Hedley Anticlimber. Cab windows modified and headlight moved.
LGB Catenary Repair Tower temporarily placed till final position is determined.
Cab roof with trolley boards and cleats with mounted trolley base and trolley hook.
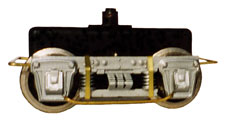
Power truck modified by removing both the lower plastic tie bar and the outer spring support bar. The brass pieces shown are the new spring support bar, the lower equalizing bar and end radius bars. This is done to look more like a streetcar truck. More items will be added to it.
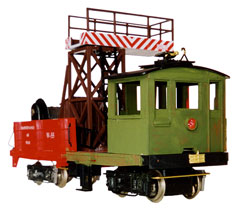
First coat of green paint. LRP Trolley Base and Trolley Hook installed. Front truck modification in progress.
Cab modification with cab height raised up 1/2" (1 scale foot).
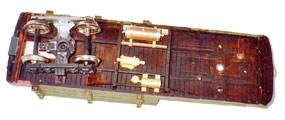
Under floor details. Two air tanks have been mounted and the brake cylinder (in the center) will be mounted in the center area.
© Light Rail Products